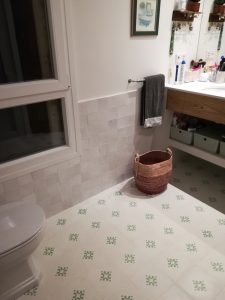
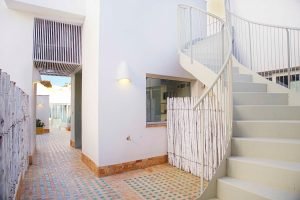
Combining cement tiles and zellige in a single project works when each material has its own surface: the matt, geometric cement tile on the floor; the glazed, irregular zellige on the wall. The rule is simple: one leads and the other supports, the two share at least one colour, and the junction between them is set out before the first piece is laid.
Why do two such different materials work together?
Because they complement each other in texture and scale. The cement tile we make in our own workshop brings a repeated pattern, a matt surface and a large piece; the handmade zellige tile brings gloss, relief and a small piece that is never the same as the one before. One brings order to the space and the other sets it in motion.
The difference starts in the workshop. A cement tile is a concrete tile: it is cold-pressed in a metal mould — a face layer of cement, marble powder and pigment over a mortar base — and then sets; it never goes into a kiln. Zellige is ceramic: clay that is moulded, fired, glazed, fired again and cut by hand, piece by piece. The whole process is explained in our article on what zellige is and how we use it.
That is why each family is tested to different standards, and their technical data sheets cannot be compared figure by figure.

| Feature | Cement tile | Zellige |
|---|---|---|
| Material | Concrete tile: pressed and left to set, not fired | Ceramic tile: fired and glazed clay |
| Test standard | UNE-EN 1339 (test report no. 9102, 200 × 200 × 15 mm format) | UNE-EN ISO 10545 and UNE-EN 14411 (test report no. 9103, 100 × 100 × 12 mm format) |
| Measured water absorption | 5.9 – 6.2 % in 20 × 20 cm hydraulic terrazzo (UNE-EN 13748-1) | 15.7 % in 10 × 10 cm glazed zellige (UNE-EN ISO 10545-3) |
| Finish | Matt, cement texture | Glazed and glossy, with crazing and variation in tone |
| Usual thickness | 1.5 – 1.8 cm | 1 – 1.8 cm |
| Pattern repetition | The pattern repeats on every tile | No two pieces are alike |
| Natural surface | Floors, plus cladding on dados and splashbacks | Walls: kitchen splashbacks, bathrooms, dados |
The figures come from the laboratory test reports. To put them in context: porcelain tile absorbs less than 0.5 %; zellige, at 15.7 %, is always treated with a water repellent.
How much of each material should you use?
One takes the lead and the other stays in the background. Two strongly patterned surfaces in the same field of view read as noise. A ratio that almost always works: around 70 % quiet material and 30 % material with character, never the other way round.
- Patterned cement tiles below, plain zellige above. The floor carries the pattern and the wall adds texture and light. It is the safest split and the one that ages best.
- Plain or marbled cement tiles below, coloured zellige above. Here the wall leads. It works very well in small bathrooms, where a patterned floor feels overwhelming.
- Zellige as a border and cement tiles as the field. A single course between the skirting and the wall tiling, or framing an opening, brings in the gloss without shifting the visual weight.
What rarely works is alternating the two materials in a chequerboard on the same surface: thicknesses, absorption and wear do not match.
How do you choose colours that don’t clash?
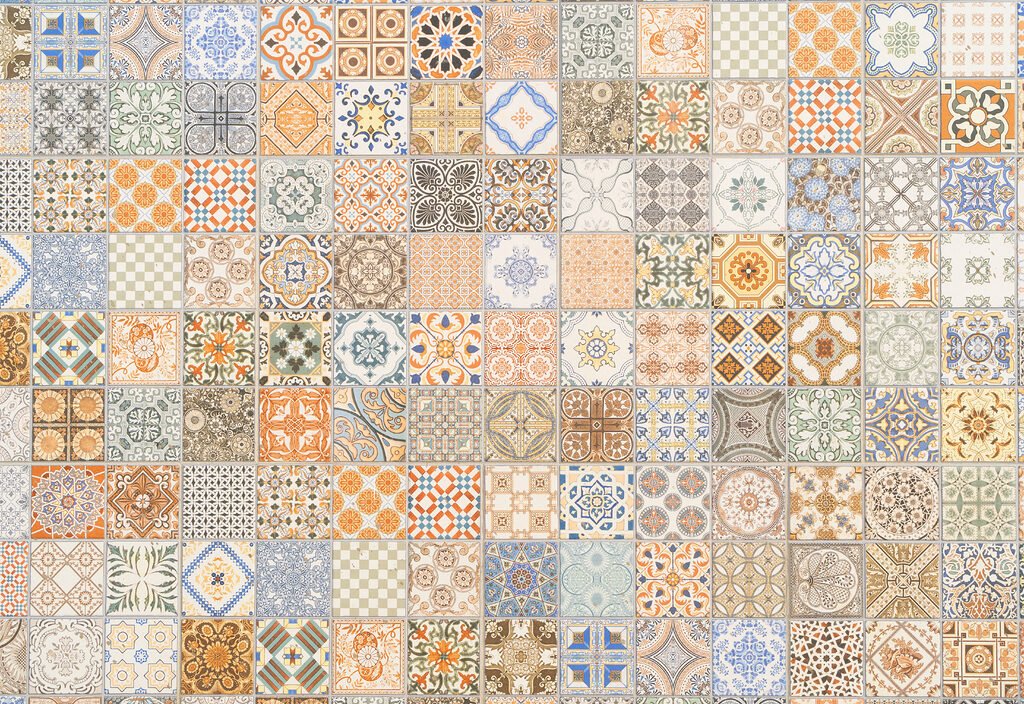
By taking the zellige colour from one that is already in the cement tile pattern. If the floor has a green in it, the zellige goes in that green or in a neutral that sits well with it: that way the whole scheme reads as a deliberate decision rather than two separate purchases.
The MC1 to MC49 colour chart is there for exactly that: you choose the floor design, identify its two or three dominant colours and use them as the basis for finding the wall glaze. Three schemes that work:
- Monochrome. Zellige in the same colour as the background of the tile: off-whites, creams, greys. It reflects the most light and is the one you will tire of least.
- Secondary colour. Zellige in the minor colour of the pattern, that blue or ochre that only peeps out in one corner of the tile. It creates unity without looking flat.
- Controlled contrast. A single saturated colour on the wall against a black-and-white or two-tone floor. It needs the rest of the room in neutrals: simple furniture and unfussy taps.
With zellige, the glaze is applied and fired by hand: within a single batch there are lighter and darker pieces, with translucent veils of glaze and crazing. That is the material, not a defect. Choose the colour by looking at a group of pieces, with a physical sample in front of you.

How do you combine them room by room?
The split changes, not the rule: in each room, first decide which of the two will draw the eye.
Kitchen
The splashback between the worktop and the wall cabinets is the natural place for zellige: it is seen up close and catches raking light, which is where its irregular gloss really pays off. On the floor, a cement tile with a lively pattern marks out the work area without the need for partitions; in a kitchen that opens onto the living room, a cement tile rug under the island and plain flooring around it.
Bathroom
The wall almost always leads: zellige to half height or on the shower wall, soft tones if the bathroom is small, and a cement tile floor with a restrained pattern. Elongated Bejemat-type formats laid in a half bond make a narrow bathroom look longer; the 15 × 5 cm Bejemat works well for this effect. Keep the taps plain: the tiles already bring plenty.
Entrance hall and corridor
The pattern goes on the floor, which takes the foot traffic, and zellige is kept for a dado or an accent panel. Strong geometry draws the eye along long passageways: the Chakar cement tile is a good example of a non-square piece that creates movement without overloading the space.
Courtyards and outdoor areas
In Andalusian courtyards the traditional pairing is a glossy dado with a patterned tiled floor, and it still works. On two conditions: the zellige only on wall sections sheltered from direct rain and only in frost-free climates; the paving checked for slip resistance before it is specified.
How do you handle the junction between the two materials?
By setting it out in advance, not on the fly. The problem is not aesthetic but one of levels: a 1.8 cm cement tile and a 1 cm zellige differ by 8 mm, and that step shows both at the foot of a wall and where one floor finish changes to another.
- Measure the actual thickness of both pieces. For cement tiles it ranges from 1.5 to 1.8 cm depending on the format; for zellige, from 1 to 1.8 cm.
- Fix the finished floor level and work upwards: the start of the wall tiling, the height of the skirting and the first course of zellige are all set out from there.
- Make up the difference with the adhesive, not with the grout. A trowel with larger notches under the thinner piece takes care of almost any step without resorting to trims.
- Decide how the wall starts: either a cement tile skirting that acts as the transition, or zellige running down to the floor with a flexible joint. Mixing the two solutions in the same room always shows.
- Leave a movement joint at changes of material and in large areas.
- Dry-lay a square metre with the two pieces together before fixing anything. It is the only way to see whether the glaze works with the floor pattern.
If the cement tile floor is new, also check the sequence of work in the guide to laying cement tiles.
What joint and grout does each material need?
Different ones — and this is where one of the most expensive mistakes is made. Zellige is butt-jointed or laid with a minimal joint, because the hand-cut edge already draws its own irregular joint; a wide, regular joint turns it into a different material. Cement tiles are laid with a very fine joint, one to two millimetres wide, so that the pattern lines up from tile to tile.
- Unsanded grout with no abrasive aggregates: the zellige glaze scratches, and the face layer of a cement tile is pigmented cement, not a glazed surface.
- Water repellent before grouting. It is the step most often skipped: without it, a pigmented grout stains the porous surface and the mark will not come out.
- No acids on cement tiles, not even for the final builders’ clean: they attack the cement and leave the surface permanently dulled.
- The same grout colour for both materials. A similar tone softens the whole; a contrasting one emphasises the geometry.
Grouting times and clean-up are covered in our article on grout for zellige.

Where is it best not to combine cement tiles and zellige?
In three situations, and test data backs up all three.
Zellige on high-traffic floors. In the abrasion test, visible defects appear at 750 revolutions, class 3 under UNE-EN ISO 10545-7 (the Spanish edition of EN ISO 10545-7): fine for rooms in normal domestic use, not for a shop corridor or a busy staircase. In those cases the zellige moves up onto the wall and the cement tile takes care of the floor.
Zellige outdoors where it freezes. Water absorption of 15.7 % means a lot of pores: it belongs on sheltered walls, not on an exposed terrace in a cold area.
Wet floors without checking slip resistance. The Spanish Building Code (CTE), in its Basic Document DB-SUA 1, requires class 3 — an Rd value above 45, measured with the friction pendulum to the Spanish standard UNE 41901:2017 EX — in outdoor areas, swimming pools and showers. Our 20 × 20 cm hydraulic terrazzo achieved a PTV of 59.5 in wet conditions at 20 °C, with individual values from 55 to 60: class 3, according to test report no. 4718. One honest caveat: the pendulum needs a sliding area of 124 × 76 mm, so small pieces have to be tested on a sample that has already been laid. If you need to demonstrate the slip resistance of a particular format, ask us for the data before you specify it.
How many pieces of each material should you order?
It depends on the format, and there are some useful overlaps: a 15 × 15 cm zellige and a 15 × 15 cm cement tile both come to the same 45 pieces per square metre, and the two 10 × 10 cm formats come to 100. That makes the calculation easier when you want the floor and the wall to share the same module.
| Material | Reference | Size | Weight | Pieces per m² |
|---|---|---|---|---|
| Cement tile | H03 | 20 × 20 × 1.5 cm | 1.30 kg/pc | 25 pcs/m² |
| Cement tile | H04 | 15 × 15 × 1.5 cm | 0.79 kg/pc | 45 pcs/m² |
| Cement tile | H06 | 10 × 10 × 1.5 cm | 0.35 kg/pc | 100 pcs/m² |
| Chakar cement tile | H61 | 20 × 17 × 1.5 cm | 0.58 kg/pc | 50 pcs/m² |
| Mjeddij zellige | ZS01 | 15 × 15 × 1.6 cm | 0.30 kg/pc | 45 pcs/m² |
| Mjeddij zellige | ZS02 | 10 × 10 × 1 cm | 0.16 kg/pc | 100 pcs/m² |
| Bejemat zellige | ZS15 | 15 × 5 × 1.5 cm | 0.18 kg/pc | 134 pcs/m² |
| Chakar zellige | ZS31 | 12 × 11 × 1 cm | 0.13 kg/pc | 135 pcs/m² |
The Chakar shape exists in both families: it is the most direct way to make the floor and the wall rhyme without repeating the material.
Measure the actual area and add the usual allowance — around 10 % — for cuts and replacements. With zellige this matters more than with any other material: every firing has its own tone, and a piece ordered two years later will not match the original batch. Check lead times and minimum orders with the workshop.

Frequently asked questions about combining cement tiles and zellige
Can cement tiles and zellige be laid on the same floor?
They can, but it is rarely worth it. The thicknesses do not match, the water absorption is very different and zellige stays at abrasion class 3, intended for normal domestic use. The sensible option: cement tiles on the floor and zellige on the wall.
How do you combine two different floors without the join showing?
By matching the levels and choosing the meeting line carefully. The transition goes where the space already changes — a doorway, the edge of an island — and never in the middle of a room. With both floors at the same level and a straight joint, there is no need for a metal trim.
Which zellige colour goes best with a patterned cement tile?
A colour that is already in the tile pattern, or a neutral. If the floor has a strong pattern, the zellige should stay quiet: off-white, cream, grey or the secondary tone of the design itself. Save saturated colours for plain or two-tone floors.
Do both materials need a water repellent?
Yes, and before grouting. Zellige is porous ceramic and cement tile is unglazed pigmented cement: both stain if they are left unprotected. Applying the water repellent before grouting stops a pigmented grout from staining the surface and leaving a haze that will not come off later.
Can this combination be used in a courtyard or on a terrace?
In a mild climate and with the wall sheltered, yes; where it freezes, the zellige stays indoors. The reason is that 15.7 % water absorption: water held in the pores expands as it freezes and bursts the piece. For outdoor paving you also need to check the slip resistance required by DB-SUA 1.
Do they need the same maintenance?
Similar for day-to-day cleaning, different when it comes to products. Both are cleaned with water and neutral soap, and both benefit from having the water repellent renewed over time. The difference lies in acids: they must never be used on cement tiles, because they attack the cement.
The next step is to see the two real pieces together: zellige glaze and cement tile patterns change a great deal with the light in each home. Write to us or book an appointment at our Seville showroom and we will put the combination together with samples from both families.