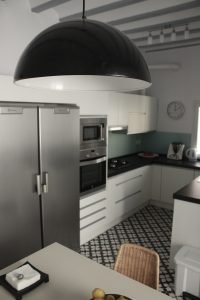
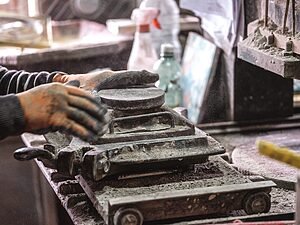
Making custom cement tiles means turning a pattern of your own into a made-to-measure tile: the motif is fitted to the format and translated into a metal template — the divider — with one cell per colour, the pigments are chosen from the colour chart and the tiles are pressed one at a time. The starting point can be a sketch, a photo of an old tile or a catalogue model in new colours.
What can you actually customise in a cement tile?
Three things: the pattern, the colours and the format. Recolouring an existing model is immediate, because the divider has already been made; drawing a new motif means building a divider, and that is where the project stops being a choice from the catalogue and becomes a workshop commission.
- Recolouring an existing model. You choose a pattern from the catalogue and decide which colour goes in each area. The result is unique — the combination is yours — with no new tooling.
- Designing a tile from scratch. Your motif, your scale, your palette. It calls for a divider of its own, a sample beforehand and an area large enough to justify the tooling.
And not every material is customised in the same way: with the cement tiles we make in-house, the pattern is a matter of the mould; with zellige or hand-painted tiles, it is a matter of the hand.
| Material | What can be customised | How it is done | Practical limit |
|---|---|---|---|
| Cement tile | Pattern, colours and format | Metal divider and cold pressing in layers | One cell per colour: no gradients or photographs |
| Hydraulic terrazzo | Colour of the mix and the aggregate | Pigmented through the body and pressed | Cannot take fine-line patterns |
| Zellige | Glaze colour, format and cut | Glazing, firing and cutting by hand | Colour and size vary from piece to piece |
| Hand-painted tile | Motif and palette | Painted on the piece and fired | Each piece is a painting: never exactly the same twice |
| Hand-painted washbasin | Motif and colours | Painted by hand on the piece | Shape and size depend on the base piece |

How do you get from an idea to a bespoke design?
By following a set sequence: first the pattern is settled, then the colour, and only at the very end is the tooling made. Reverse the order and you pay for the divider twice.
- Gather your reference. A photo, a cut-out, a hand drawing or a vector file.
- Choose the format. The motif is drawn for a specific size: it does not work the same way at 20×20 cm as it does in a hexagon.
- Fit the motif to the tile. It is redrawn so that the pattern matches up on all four sides and repeats without breaks.
- Set the number of colours. Each colour is a cell in the divider: the pattern is broken down into flat areas.
- Simulate the overall effect. Four or nine tiles together, with border and skirting, in the room where they are going.
- Have the divider made. A blacksmith shapes the brass following the approved drawing; from this point on, changing a line means remaking the divider.
- Ask for a physical sample. Seeing it in the light of your own home reopens decisions that seemed settled on screen.
- Production and curing. The batch is pressed and left to set and dry; that time cannot be rushed.
What works as a starting point
Almost anything that can be measured: the tile in your hallway, photographed with a tape measure beside it, an Art Nouveau pattern, a business logo or a vector file. What does not work is an image with shadows or gradients: cement tiles work in flat areas of colour. If you would rather start from something already drawn, our cement tile patterns include geometric and floral designs, as well as models signed by the designers who work with our workshop.
The simulator: try out colours before drawing anything
It is worth trying the design simulator first; it works in the same way for cement tiles as for zellige panels. You choose the tile — square or hexagonal — then the model, and you paint: first the colour, then the area.


The process is repeated for the finishing pieces: the border in the example is model 54 by Yela Álvarez Ariza, and the skirting needs only one colour. Designing them at the same time as the central field saves you from a beautiful floor with badly finished edges.


What is the divider and what limits does it set on your pattern?
The divider is the mould for the pattern: a piece of brass, made by hand by a blacksmith, that splits the face of the tile into watertight cells, one per colour. The pigmented pastes are poured into it, it is lifted out and the press compacts the layers cold. That is the essence of the cement tile manufacturing process: there is no kiln, only pressure and setting. Hence the limits on the design:
- No gradients. Each area is a flat colour; transitions are achieved with different tiles, not within a single one.
- Very fine lines are delicate. The brass wall needs a minimum thickness so that it does not bend or let the pigments mix.
- The more colours, the slower. Each cell is filled by hand: a restrained palette is not just an aesthetic choice.
- The pattern has to close neatly at the edge. If the motif runs on from one tile to the next, the joins take priority over the centre.
- Photographs do not translate. An image with subtle shading will not fit into a divider; that is what hand-painted tiles are for.
- The mould gives no shine. The tile comes out of the press with a matt finish; any shine you are after comes from the treatment applied afterwards.
Which format should you choose for a bespoke design?
The format determines the scale of the pattern and the rhythm of the floor: a large motif loses impact when it is broken up across small tiles, and a fine pattern turns into visual noise when it is enlarged. This selection includes the weight and the number of tiles per square metre, the figure used to calculate the order.
| Shape | Ref. | Dimensions | Weight | Units / m² |
|---|---|---|---|---|
| Square | H02 | 25 × 25 × 1.8 cm | 2.30 kg | 16 |
| Square | H03 | 20 × 20 × 1.5 cm | 1.30 kg | 25 |
| Square | H06 | 10 × 10 × 1.5 cm | 0.35 kg | 100 |
| Rectangular | H11 | 30 × 15 × 1.6 cm | 1.45 kg | 23 |
| Hexagonal | H21 | 30 × 20 × 1.7 cm | 1.62 kg | 21 |
| Hexagonal | H23 | 11.5 × 10 × 1.5 cm | 0.35 kg | 116 |
| Chakar | H61 | 20 × 17 × 1.5 cm | 0.58 kg | 50 |
| Insert tile | H07 | 7 × 7 × 1.5 cm | 0.25 kg | 205 |
We also make the 15×15 and the 20×10, the octagonal, the Diamante, the Laghaz and Labrys shapes and the skirting pieces (HR01, HR02, HR11 and HR21, 3 to 5 pieces per linear metre), which are essential if the perimeter is to match the design. They are all in the full list of cement tile formats.
The formats with names of their own are the ones that change the result most without touching the pattern. The Chakar cement tile, at 20 × 17 cm, creates, on its own, a tessellation that no square can match: sometimes the bespoke design lies in the shape, not in the motif.
How do you choose the colours for a custom tile?
By starting from a fixed chart and limiting the palette. The cement tile colour chart runs from MC1 to MC49, and three to five shades are enough for almost any project: a background, one or two secondary colours and an accent.
- Light. In dark interiors, muted tones look duller still; in bright spaces, strong colours gain body without becoming overpowering.
- Use. Kitchens and bathrooms suit fresh colour schemes; living rooms, hallways and entrance halls age better with earth tones, warm greys and beige.
- Contrast, not colour. From three metres away, all you can see is the difference between background and motif: two similar shades turn an elaborate pattern into a blur.
- Grout. The grout colour is one more colour in the design and can strengthen the pattern or wipe it out. It is decided with the sample in front of you, not at the end of the job.
On single-colour tiles, variation in shade is more noticeable because there is no pattern to disguise it: it is inherent in a hand-pressed material, not a defect.
Can zellige and hand-painted tiles be customised too?
Yes, but with a different logic: glazed ceramics have no pattern mould; they have glaze, cutting and the brush. With zellige you choose the colour and the format, and the design emerges as the pieces are put together: a 15 × 5 cm piece laid in a brick bond gives a very different result from the same colour in 10 × 10 cm.

When a project calls for real geometry — stars, interlacing, rosettes — the way to go is hand-cut zellige, with each piece shaped to fit the layout. And if you are after a scene or a motif with subtle shading, hand-painted tiles and washbasins can do what no divider can.
Does a bespoke design perform as well as a catalogue one?
Yes. The pattern does not change the material: the same mix, the same pressure and the same curing as any model in the catalogue, so the performance is that of the material, not of the design. And it has been measured. In our laboratory test reports, issued by Elabora (laboratory no. AND-L-155, registered with the Andalusian regional government), the cement tile is tested to UNE-EN 1339 in the 200 × 200 × 15 mm format (report no. 9102), and the 20 × 20 cm hydraulic terrazzo reached a PTV of 59.5 in the wet pendulum test (report no. 4718): class 3, the highest level that the Spanish Building Code (CTE) requires in its Basic Document DB-SUA 1 for outdoor areas, swimming pools and showers. The same terrazzo has an average absorption of 5.9 % to 6.2 % according to UNE-EN 13748-1.
A useful point when drafting a project specification: cement tiles and terrazzo are not ceramics. They set rather than being fired, and they fall under UNE-EN 1339, not the UNE-EN ISO 10545 series that applies to zellige and terracotta.
What does the workshop need to quote for your design?
The more information we receive in one go, the sooner the price can be settled:
- The pattern or reference: a photo, sketch, saved simulation or vector file.
- The format you want and, if the screed limits the thickness, a note saying so.
- The square metres of each area and the linear metres of border and skirting.
- The colours, with their MC references if you have already chosen them.
- A layout sketch if there is a central tile rug or junctions with other materials.
- The intended use: indoors, outdoors, a home or commercial premises with heavy foot traffic.
Add a margin of between 10 % and 15 % of the area for cuts and spares: the day a tile has to be lifted because of a leak, four pieces from the same batch are worth more than any guarantee.
Exclusive designs
Some clients ask to keep their design exclusively for themselves. That is the case with the model we call Palmeras in the workshop: a pattern with a tribal feel, in green, orange and grey, which appears in neither the catalogue nor the simulator because its owner wanted it to be theirs alone.

Common mistakes when ordering a bespoke design
- Finalising the pattern without deciding on the format, and then finding out that the motif does not fit.
- Choosing the colours on screen rather than on a physical sample in the actual space.
- Measuring too tightly, with no margin for cuts or spares.
- Ordering a highly fashionable pattern: a cement tile floor outlasts the trend.
Frequently asked questions about custom cement tiles
What is the minimum order for a custom cement tile?
It depends on whether a new divider has to be made. Recolouring an existing model does not require new tooling; a design from scratch does, and that divider has to be paid off across the order. These are two different scenarios: check the minimum and the lead time for each with the workshop before you draw anything.
Can I have an old tile from my home reproduced?
In most cases, yes. You will need a loose tile or a straight-on photo with a tape measure next to it, the exact size and the thickness. The colours are matched as closely as possible from the current chart: the original pigment does not always exist, and a hundred-year-old tile has an aged tone that a new piece cannot give.
Can a logo or a photograph be put on a cement tile?
A logo, yes, as long as it is flat, built up from areas of colour and free of overly fine lines or gradients: that is exactly what a divider does well. A photograph, no. For images with subtle shading or freehand strokes, the solution is the hand-painted tile, piece by piece.
How many colours can a bespoke design have?
Each colour takes up a cell in the divider and is filled by hand, so the number has a direct bearing on how complex the tile is to make. In practice, the designs that work best use between three and five colours: restrained palettes age better.
Do I need a sample before the full order is made?
It is highly recommended. Seeing four or nine tiles laid out together reveals what no simulation shows: the real thickness of the lines, how the background behaves in the light of the room and whether the contrast holds up at a distance. That is the time to go a shade lighter or darker, before the batch is pressed.
Is a custom design suitable for outdoor use or for premises with heavy foot traffic?
The material is the same as in the catalogue, so the answer depends on the product and the treatment, not on the pattern. The slip resistance and absorption figures are in the laboratory test reports, and those are what the project’s architect or site supervisor will want to see. Tell us the intended use when you ask for a quote.
If you already have an idea, even if it is just a blurry photo of your grandparents’ floor, the next step is to show it to us. Write to us or book an appointment at our Seville showroom with your reference, the format and the approximate square metres, and we will tell you what can be made as it is and what would be worth adjusting.